Finally got around to taking a pictures! It's been a while, I know. Finished building the model not too long ago, but I've been procrastinating updating my blog.
 |  |
Hm, what can I say about this model. The core fighter's four thruster arms are pretty loose, that's my major gripe. It's hard to pose them without them flailing around and loosing their position. I wish the weapon components came in both white and grey parts (instead I had to paint the grey on, which didn't come out too well).
 |  |
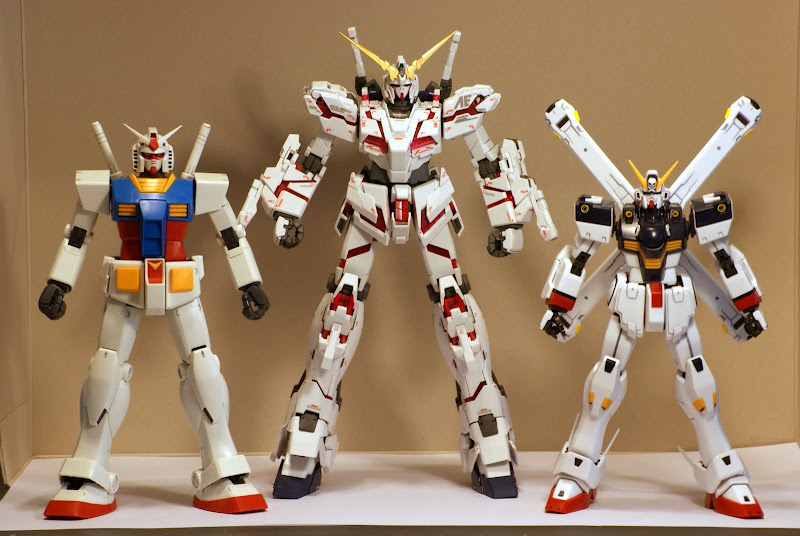
As I've said before, this kit is pretty small in stature. Here's a photo to demonstrate:

Lastly, a photodump of my last WIP shots. I masked the parts on the weapon pieces for painting. Didn't work out that well. When I removed the tape at the end the edges of the paint were a little jagged and some paint had seeped under the tape. Maybe I'm just not doing it right... Probably won't use this method for the gold parts on Sinanju.

 |  |
 |  |
I always sigh when I see people complaining about loose parts..
ReplyDeleteIt's not that hard to fix, two to three layers of matte/clear topcoat fixes the loose joints.
You can also some clear nail polish..
Forgot to comment on the gunpla.. (>_<) (>.<)
ReplyDeleteOverall it's nice and clean, the gray doesn't look that bad on the pictures. Added more depth to the weapons
I think you should've painted all the yellow parts as gold since you'd already painted the thrusters.
And a little advice coming from me.. What separates men from boys in this hobby. Going an extra mile to make the gunpla good instead of complaining ;D
Thanks for the tip about strengthening joints. Topcoat is rare commodity nowadays, maybe I'll look into clear varnish like you said.
ReplyDeleteI wanted to let metallic colors (like gold and silver) remain on the inner frame pieces, and have the more common yellow remain on the outer parts. In particular, a gold V-fin would have looked over the top.
Yeah, the grey on the weapons certainly helps, other wise they would be completely white. I'll just have to find a better way to paint small parts in the future.
As I always like to have my models up to par with my own standards, me complaining as you put it, is just a way of showing I don't know how to fix something. That's where the readers come in to help point out new hobby methods and tips. After all, I'm still learning many things about this hobby. I appreciate the comments and criticism, it's nice to have feedback.
I could see your side on the yellow/gold parts.. To each his own I guess.
ReplyDeleteTo clarify things up I'm glad you did add details to the weapons instead of ranting/whining. That's what the last part of my second comment was about.
Again I've forgotten to say something about the masking method you've used..
ReplyDeleteSo what brand of tape did you use? The paint seeped under the tape because it's not seated as well as it's supposed to be.
You could try and push/flatten the tape off with a hobby knife or a small screwdriver.
I honestly don't know much about the tape I used. I just ordered a cheap random one from a Japanese hobby site (here).
ReplyDeleteYeah, I probably should have flattened it harder. It's also pretty thin and can slide around (not the strongest adhesive). Do you have a recommendation for a better tape?
Haven't tried much masking tapes but I'm currently using Tamiya's and they're pretty awesome..
ReplyDeleteFor masking I usually use a toothpick to flatten the surface. Best is not to use a very sharp object as you might risk scratching the paint job!!!
ReplyDeleteAnyway good job on the Crossbone matie :D Those little bits of coloring really adds more details to the overall look XD
Thanks, appreciate it! Yeah, I should be getting some better masking tape soon, so I'll try that method, sounds good.
ReplyDeleteSo it seems like you didn't put on the decals? haha... nice work, especially like the gold and silver color added to the core thruster. And I do have the same preference with you, gold on the inside while yellow on the outside ^^
ReplyDeleteGood to hear that you agree! I'm going to try and paint more details on the inner frame in the future (at least for metallic bits like thrusters), glad that people approve!
ReplyDeleteI actually have the water slide decals for this model. I prefer building more than applying decals, so... it may be a while before I do them (i.e. my RX-78, Blue Frame, and Stamen kits) Yeah... it'll happen eventually! That's when I get to Topcoat and really make it look good.